Azure App Service is a robust cloud based service that integrates everything that you may need to easily and quickly build web and mobile apps for any device or platform. Additionally, Azure Web applications provide self-patching and scalable web hosting service. If deploying your first ASP.NET web app to Azure platform seems a real challenge, then here is the complete guide to do so!
To clear the intentions, this blog is primarily for those who have a basic understanding of web application, web server and database. However it’s explained in such a way that beginners too can get the gist of the idea.
For reducing, the complexity of selecting the automation services or developing the best applications must be the goal in every step of the business. We would like to share the basic understanding of web application, web server and database. In order to create a web application, we can use any programming language. For Example: – PHP, Ruby, Python, Java, C#, Visual Basic etc. Here, we have developed an application using Visual Studio and .Net Framework which basically uses C# as the programming language. Microsoft Visual Studio is an integrated development environment (IDE) from Microsoft. It is used to develop computer programs for Microsoft Windows, as well as web sites, web apps, web services and mobile apps.
The use case we are describing below is related to an actual migration activity we conducted for one of premiere financial clients. The initial application was developed as an on premise web application for customer authentication using an ID card reader and uses SignalR to dynamically update the admin dashboard on new data read from the cards. As per our customer requirements, the application was created as a .NET application and hosted initially in-house on the UAT platform.
There were two servers, one was configured as a Windows IIS web server and the other was configured as a MSSQL database server. Windows operating system was opted as the application was designed using .Net framework. The application worked like a charm and our customer was satisfied with the test cases.
Our .NET Team has been producing guidance for hosting applications, web applications, database & Forms mobile apps. You can use this guidance to help build your applications according to accepted industry patterns with .NET and C#.
Here the question arises – Where will the production application be hosted? Multiple methods are there if we go by the traditional method, the production application can be hosted in-house on production web server and database with the necessary security setup. A domain has to be registered and pointed to the production server. Necessary DNS changes have to be done and also proper NAT (Network Address Translation) and firewall a rule has to be configured on the network level. This is one way of approaching and getting the desired results. The other method is to purchase a remote server from a reputed hosting provider and the server will be hosted in their remote data center. This might not be a cost effective solution as a remote dedicated server comes with fairly high costs though we do not have the hassles of maintaining the data center and managing its expenses. It is managed by the hosting provider itself. We can also get a Virtual Machine or an instance (IAAS – Infrastructure as a Service) from any cloud solution providers like Microsoft Azure, Google Cloud or Amazon AWS which is a good option as the monthly costs are based on PAYG (Pay-As-You-Go) model. After exploring all these options, we decided to try out Azure Web App platform or PAAS known as Platform as a Service.
Azure Web App Service (PAAS – Platform as a Service)
Microsoft Azure App Service is a fully managed compute platform that is optimized for hosting websites and web applications. Microsoft takes care of the infrastructure to run and scale the apps.
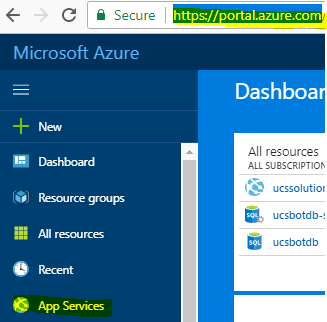
First and foremost, an account has to be created with Microsoft Azure. Log into Azure Portal – https://portal.azure.com and select “App Services” >> Web App + SQL
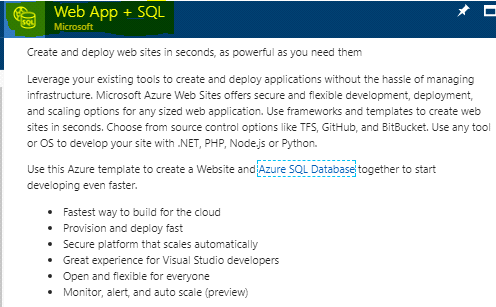
This application requires DB. So, we selected Web App + SQL.
- App Name – Website name – ucsapp.azurewebsites.net
- Subscription – Payment – Pay As You Go Model
- Resource Group – Logical Container for Azure Resources
- App Service Plan – Server Configuration and Web App Features
- SQL Database – DB Name, DB Target Server, Pricing tier, Collation
There are various App Service plans. We had selected S2 Standard Plan as per our application’s requirements. Below mentioned are the features of this plan:-
App Service Plan Pricing Tier – S2 Standard Plan
- 2 CPU Cores
- 3.5 GB RAM
- 50 GB Storage
- Custom Domains + SSL + SNI & IP SSL Support included.
- Up to 10 instances – Auto scale – Load Balancing
- Daily Backup
- 5 slots – Web app staging.
- Traffic Manager – Geo availability
Similarly, there are various SQL DB Plans. We had opted for Standard S0 SQL DB Plan.
SQL DB Plan Pricing Tier – S0 Standard Plan
- 10 DTU
- 250 GB Storage
- SQL_Latin1_General_CP1_CI_AS – Collation
http://dtucalculator.azurewebsites.net/
What is DTU (Database Throughput Unit)?
Database Throughput Unit provides a way to describe the relative capacity of a performance level of Basic, Standard, and Premium databases. DTUs are based on a blended measure of CPU, memory, reads, and writes. As DTUs increase, the power offered by the performance level increases.
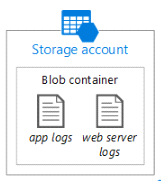
Application Log Files Storage
The application log files can be stored in a directory inside the web app; however, Azure recommends storing it in a separate storage container. A Storage Account has to be created. Storage service offers three types of blobs – block blob, append blob and page blob.
We created storage account with Append blob type. All writes to an Append Blob happen at the end of the blob. Updating and deleting existing blocks is not supported. To modify an Append Blob, we add blocks to the end of the blob via the new Append Block operation. Each appended block is accessible immediately.
Append Blob is optimized for fast append operations, making it ideal for scenarios where the data must be added to an existing blob without modifying the existing contents of that blob (Eg. logging, auditing). In addition, Append Blob supports having multiple clients writing to the same blob without any need for synchronization (unlike block and page blob).
Azure Storage Tools works directly with Windows Azure Storage Blobs, Tables and Queues.
- Primary Blob Service Endpoint
- Secondary Blob Service Endpoint
- Storage Container URL
Every log Entry is stored as separate XML file. Below mentioned are the details of Azure Storage service that has to be noted down in order to configure Application logging with Azure Storage service.
- Container Name: Name of the container in Blob Storage.
- Directory Name: Name of the folder in the specified container.
- Connection String: The full Azure Storage connection string.
- Connection String: Name of a connection string specified under connection String.
We have configured application logging using log4net. For Azure, we have to add Log4net Appender Azure library to visual studio project via NuGet. Right click on the visual studio project and click ‘Manage NuGet Packages’. Search for ‘log4net.Appender.Azure’ and click ‘Install’. This will install all the libraries required for using the application logging with Azure Storage Services. It enabled the .net application to use Azure log4net logging and Azure Storage services to save the logs.
Deploy the Application Files to Azure App Service.
Once the web app plans, DB plan and Storage account is created, it will provide FTPS URL and logins. The application files can be deployed either using FTPS credentials or using Kudu Debug Console. There are also other options for deployment like directly deploying from Visual Studio Team Services, OneDrive, Local Git Repository, GitHub, Bitbucket, Dropbox or any other External Repository.
Application connectivity to database is done using the connection string which is ADO.NET, JDBC, ODBC, and PHP. This was added to the web.config (configuration file) of the application.
Below mentioned is a sample configuration file that is visible in the azure portal of the web app plan created:-
ADO.NET SQL Authentication
Server=tcp:appdb.database.windows.net,1433;Initial Catalog={Web-App-DB-Name};Persist Security Info=False;User ID={DB_username};Password={DB_password};MultipleActiveResultSets=False;Encrypt=True;TrustServerCertificate=False;Connection Timeout=30;
Following this process, a web application, can be developed and deployed with bare minimum costs and hosted using Microsoft Azure App Services. As this process saves time and cost of maintain the hosting server, infrastructure and data center, we recommend this as the ideal process to follow
Interested in knowing more? Please click here to contact us.